Python 爬虫验证码处理方案
简介
嗨,大家好,我是太上问情,一个学习爬虫好几年都还没有真正入门的小趴菜。
本文记录本人 Python 爬虫学习过程中,验证码 处理的各种解决方案,欢迎大家指正。
本人计划在本文完成如下验证码的处理,目前一个都没有完成,希望我能很快完成!
- [ ] 数字验证码
- [ ] 字母验证码
- [ ] 文字验证码
- [ ] 图像验证码
本文编写过程中参考、引用的文章:
滑动验证码
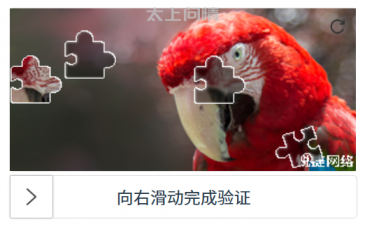
滑动验证码通常分为两张图片,一张背景图,一张前景图。通过鼠标拖动下方的箭头,带动前景图移动到背景图的缺口处,从而实现人机验证。

解决思路
- 获取前景图、背景图保存到本地
- 本地计算出前景图移动到缺口所需要的坐标值
- 然后通过 selenium 或者 Python 调用接口的方式实现验证
实战
基本信息
本次测试的验证码平台为 https://captcha.ruijie.com.cn, 计划通过 Python 调用接口的方式进行验证。
由于该网站的验证码信息采用了 Base64 编码,且接口验证还进行了加密处理。所以我们还需要进行 Base64 编码字符串转图片和一个简单的 JS 逆向过程。
获取验证码的接口
接口地址:https://captcha.ruijie.com.cn/captcha/get
请求
接口入参如下,请求参数中有 验证码类型、连接ID、当前时间戳 三个参数,我们在请求图片的时候只需要将 ts 设置为当前时间戳即可。
{
  "captchaType": "blockPuzzle",
  "clientUid": "slider-dc12464e-d331-43f1-b71a-ab05e5ab3e8d",
  "ts": 1733533403343
}
响应
接口响应中,包含了 密匙、token、前景图、背景图 这四个主要信息,其中前景图、背景图为 Base64 编码的字符串,需要解码为图片才可以保存到本地,密匙、token 用于在后面的校验接口中使用。
{
    "repCode": "0000",
    "repMsg": null,
    "repData": {
        "captchaId": null,
        "projectCode": null,
        "captchaType": null,
        "captchaOriginalPath": null,
        "captchaFontType": null,
        "captchaFontSize": null,
        // 密匙
        "secretKey": "cpXUlRLZ1tmcriu3",
        // 背景图Base64编码字符串
        "originalImageBase64": "iVBORw0KGgoAAAANSUhECC",
        "point": null,
        // 前景图Base64编码字符串
        "jigsawImageBase64": "iVBORw0KGgoAAAANErkJggg==",
        "wordList": null,
        "pointList": null,
        "pointJson": null,
        // 验证码token
        "token": "3b6b930436a34153883fc54e8ce1a37f&&slider-dc12464e-d331-43f1-b71a-ab05e5ab3e8d",
        "result": false,
        "captchaVerification": null,
        "clientUid": null,
        "ts": null,
        "browserInfo": null
    },
    "success": true
}
保存验证码到本地
调用接口获取验证码
def get_captcha():
    """
    获取验证码的接口
    :return:
    "" "

    # 请求参数
    json_data = {
        # 验证码类型
        'captchaType': 'blockPuzzle',
        # 连接 ID
        'clientUid': 'slider-dc12464e-d331-43f1-b71a-ab05e5ab3e8d',
        # 当前时间戳
        'ts': int(time.time()),
    }

    # 发起请求
    response = requests.post('https://captcha.ruijie.com.cn/captcha/get', headers = headers, json = json_data)
    if response.status_code == 200 and response.json()['success'] == True:
        print('请求验证码成功,正在将验证码 base64 编码转为图片保存至本地')
        rep_data = response.json()['repData']
        # 拼图块
        base64_to_img_and_save(rep_data ['jigsawImageBase64'], 'img/target.png')
        # 原始图片
        base64_to_img_and_save(rep_data ['originalImageBase64'], 'img/background.png')
        print('拼图保存成功!')
        print(colored(f'获取验证码-原始响应:{response.json()}'))

        return rep_data ['token'], rep_data ['secretKey']
base64编码字符串转图片并保存到本地
def base64_to_img_and_save(base64_str, file_name):
    base64.b64decode(base64_str, validate = True)
    with open(file_name, 'wb') as f:
        f.write(base64.b64decode(base64_str))
计算滑动距离
计算前景图到背景图的距离
calc_x.py是用于计算前景图移动到背景图重合位置的坐标的,是由CSDN搜索到的上海悠悠同学提供的计算方案,我这边测试过后直接使用了。
import cv2

# 作者-上海悠悠 QQ 交流群:730246532
# blog 地址 https://www.cnblogs.com/yoyoketang/

def show(name):
    '''展示圈出来的位置'''
    cv2.imshow('Show', name)
    cv2.waitKey(0)
    cv2.destroyAllWindows()


def _tran_canny(image):
    "" "消除噪声" ""
    image = cv2.GaussianBlur(image, (3, 3), 0)
    return cv2.Canny(image, 50, 150)

def get_width(image_path):
    '''获取图片宽度'''
    image = cv2.imread(image_path)
    size = image.shape
    return size [1]


def detect_displacement(img_slider_path, image_background_path):
    "" "detect displacement" ""
    # # 参数 0 是灰度模式
    image = cv2.imread(img_slider_path, 0)
    template = cv2.imread(image_background_path, 0)

    # 寻找最佳匹配
    res = cv2.matchTemplate(_tran_canny(image), _tran_canny(template), cv2.TM_CCOEFF_NORMED)
    # 最小值,最大值,并得到最小值, 最大值的索引
    min_val, max_val, min_loc, max_loc = cv2.minMaxLoc(res)

    top_left = max_loc [0]  # 横坐标
    # 展示圈出来的区域
    x, y = max_loc  # 获取 x, y 位置坐标

    w, h = image.shape [::-1]  # 宽高
    cv2.rectangle(template, (x, y), (x + w, y + h), (7, 249, 151), 2)
    # 展示标记位置,调试完毕后应该注释
    # show(template)
    return top_left

if __name__ == '__main__':
    top_left = detect_displacement("img/target.png", "img/background.png") + 5
    print(top_left)
计算最终移动坐标
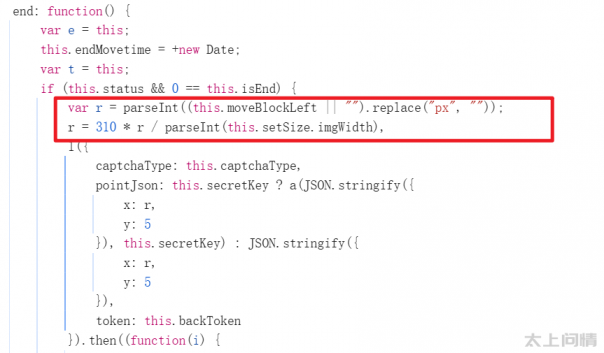
上面计算的只是前景图移动到背景图所需要的距离,但是在web页面中我们实际需要移动的距离并不是这个,还需要对页面滑块的绑定事件进行分析,从而得到最终坐标。

阅读网页Js源码之后,得到了如下计算方式:
# 计算滑动距离
x = calc_x.detect_displacement('img/target.png', 'img/background.png')
print(f'计算鼠标滑动距离:{x}')
image_width = calc_x.get_width('img/background.png')
print(f'获取图片宽度:{image_width}')
x = int(310 * x / int(image_width))
point = {'x': x, 'y': 5}
print(f'最终坐标:{point}')
如果是使用selenium等web自动化测试框架的话,此时已经可以结束了,使用这个坐标去验证即可。
校验验证码的接口
接口地址:https://captcha.ruijie.com.cn/captcha/check
入参
校验接口的入参中,唯一麻烦的是pointJson字段,这是一个经过加密后的坐标信息。我们必须保证我们使用Python调用校验接口时,入参格式和web端保持完全一致,这样才能通过校验。
{
    // 和获取验证码时保持一致即可
  "captchaType": "blockPuzzle",
    // 加密后的移动坐标
  "pointJson": "vl/vcOtbY1gnkqEQUxfmyKFuwO06Lxq9zVzrIHNpusk=",
    // 获取验证码时返回的token
  "token": "94a1b50afeff4526985be645291cf015&&slider-dc12464e-d331-43f1-b71a-ab05e5ab3e8d"
}
响应
{
    // repcode == “000”即为校验通过
  "repCode": "0000",
  "repMsg": null,
  "repData": {
    "captchaId": null,
    "projectCode": null,
    "captchaType": "blockPuzzle",
    "captchaOriginalPath": null,
    "captchaFontType": null,
    "captchaFontSize": null,
    "secretKey": null,
    "originalImageBase64": null,
    "point": null,
    "jigsawImageBase64": null,
    "wordList": null,
    "pointList": null,
    "pointJson": "xDYbVcQ519Oa0C2ZQkv3X7v9eLqUY1s9os47nIRiIhs=",
    "token": "dde9b4cc6f0d41079155911b3ddc4870",
    "result": true,
    "captchaVerification": null,
    "clientUid": null,
    "ts": null,
    "browserInfo": null
  },
  "success": true
}
解析坐标加密规则
Debugger 查找加密规则………………


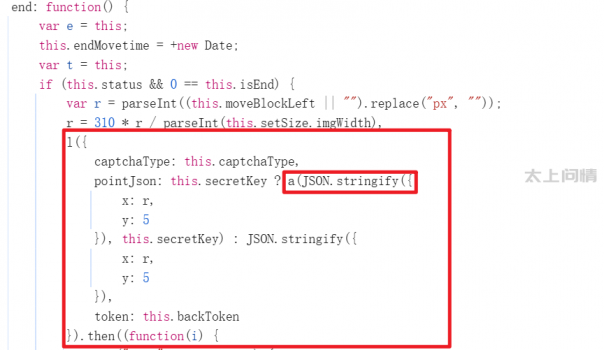
经过Js调试发现,加密规则为下面的a(e)方法,通过传入获取验证码时得到的secretKey和json格式的坐标值进行加密。
l({
    captchaType: this.captchaType,
    // 看这里
    pointJson: this.secretKey ? a(JSON.stringify({
        x: r,
        y: 5
    }), this.secretKey) : JSON.stringify({
        x: r,
        y: 5
    }),
    token: this.backToken
})

// 加密方法
function a(e) {
    var t = arguments.length > 1 && void 0 !== arguments[1] ? arguments[1] : "XwKsGlMcdPMEhR1B"
    , r = o.a.enc.Utf8.parse(t)
    , i = o.a.enc.Utf8.parse(e)
    , n = o.a.AES.encrypt(i, r, {
        mode: o.a.mode.ECB,
        padding: o.a.pad.Pkcs7
    });
    return n.toString()
}
那么,我们根据这个加密规则,重新编写我们能够调用的加密方法保存至encrypted.js,后续在Python中使用execjs调用该文件中的方法。
const crypto = require("crypto-js");

/**
 * 使用AES加密算法加密数据。
 * @param {{x: number, y: number}} data - 待加密的数据。
 * @param {string} [key='XwKsGlMcdPMEhR1B'] - 加密使用的密钥。
 * @returns {string} 加密后的字符串。
 */
function encryptData(data, key = 'XwKsGlMcdPMEhR1B') {
    // 将Json对象转为字符串
    data = JSON.stringify(data);
    // 将字符串转换为Utf8格式的数据
    const keyUtf8 = crypto.enc.Utf8.parse(key);
    const dataUtf8 = crypto.enc.Utf8.parse(data);

    // 使用AES加密数据,ECB模式,PKCS7填充
    const encrypted = crypto.AES.encrypt(dataUtf8, keyUtf8, {
        mode: crypto.mode.ECB,
        padding: crypto.pad.Pkcs7
    });

    // 返回加密后的字符串
    return encrypted.toString();
}


// 测试加密方法生成的内容和web页面生成的内容是否一致
const jsonData = {
    x: 77.96969696969697,
    y: 5
};
const encryptedData = encryptData(jsonData, 'Xwi0izQSmFaqLjeJ');
console.log(encryptedData);

// 输出
OniLz5FGMjM0HFF5cYfxnjiyh9xRFd5IVH79YBp/Aks=
完整代码 and 校验
完整代码
import base64
import requests
import time
import calc_x
import execjs

# 获取验证码的接口
def get_captcha():
    # 请求参数
    json_data = {
        # 验证码类型
        'captchaType': 'blockPuzzle',
        # 连接ID
        'clientUid': 'slider-dc12464e-d331-43f1-b71a-ab05e5ab3e8d',
        # 当前时间戳
        'ts': int(time.time()),
    }

    # 发起请求
    response = requests.post('https://captcha.ruijie.com.cn/captcha/get', headers=headers, json=json_data)
    # 如果请求成功并且返回结果为True
    if response.status_code == 200 and response.json()['success'] == True:
        print('请求验证码成功,正在将验证码base64编码转为图片保存至本地')
        rep_data = response.json()['repData']
        # 将拼图块的base64编码转换为图片并保存
        base64_to_img_and_save(rep_data['jigsawImageBase64'], 'img/target.png')
        # 将原始图片的base64编码转换为图片并保存
        base64_to_img_and_save(rep_data['originalImageBase64'], 'img/background.png')
        print('拼图保存成功!')
        print(f'获取验证码-原始响应:{response.json()}')

        return rep_data['token'], rep_data['secretKey']

# 校验验证码
def check(token, pointJson):
    json_data = {
        'captchaType': 'blockPuzzle',
        'pointJson': pointJson,
        'token': token,
    }

    response = requests.post('https://captcha.ruijie.com.cn/captcha/check', headers=headers, json=json_data)
    # 如果校验成功
    if response.status_code == 200 and response.json()['success'] == True:
        print('验证码校验成功')
        print(response.json())

# 将base64编码转换为图片并保存
def base64_to_img_and_save(base64_str, file_name):
    base64.b64decode(base64_str, validate=True)
    with open(file_name, 'wb') as f:
        f.write(base64.b64decode(base64_str))

# 使用JavaScript算法计算点的坐标
def calc_pointJson(json, key):
    with open('encrypted.js', 'r', encoding='utf-8') as f:
        js_code = f.read()

    # 编译JavaScript代码
    context = execjs.compile(js_code)
    result = context.call('encryptData', json, key)

    return result

if __name__ == '__main__':
    headers = {
        # 请求头信息,模拟浏览器发送请求
        'Accept': 'application/json, text/plain, */*',
        'Accept-Language': 'zh-CN,zh;q=0.9',
        'Connection': 'keep-alive',
        'Content-Type': 'application/json; charset=UTF-8',
        'Origin': 'https://captcha.ruijie.com.cn',
        'Referer': 'https://captcha.ruijie.com.cn/',
        'Sec-Fetch-Dest': 'empty',
        'Sec-Fetch-Mode': 'cors',
        'Sec-Fetch-Site': 'same-origin',
        'User-Agent': 'Mozilla/5.0 (Windows NT 10.0; Win64; x64) AppleWebKit/537.36 (KHTML, like Gecko) Chrome/131.0.0.0 Safari/537.36',
        'X-Requested-With': 'XMLHttpRequest',
        'sec-ch-ua': '"Google Chrome";v="131", "Chromium";v="131", "Not_A Brand";v="24"',
        'sec-ch-ua-mobile': '?0',
        'sec-ch-ua-platform': '"Windows"',
    }

    # 获取验证码
    token, secretKey = get_captcha()
    print(f'图片token:{token}')
    print(f'图片校验Key:{secretKey}')

    # 计算滑动距离
    x = calc_x.detect_displacement('img/target.png', 'img/background.png')
    print(f'计算鼠标滑动距离:{x}')
    image_width = calc_x.get_width('img/background.png')
    print(f'获取图片宽度:{image_width}')
    x = int(310 * x / int(image_width))
    point = {'x': x, 'y': 5}
    print(f'最终坐标:{point}')
    pointJson = calc_pointJson(point, secretKey)
    print(f'调用js加密算法获取加密后的坐标Json:{pointJson}')

    # 校验
    check(token, pointJson)
校验


评论区